拓冰网站定制
文章目录
- 一. 关系图概览
- 二. 各层级概述
- 1. Activity
- 2. Window
- 3. PhoneWindow
- 4. DecorView
- 5. ViewRoot
- 6. WindowManager
- 7. WindowManagerService
- 三. 基于源码的深入分析
- 1. PhoneWindow,DecorView,setContentView源码理解
- 2. DecorView创建流程
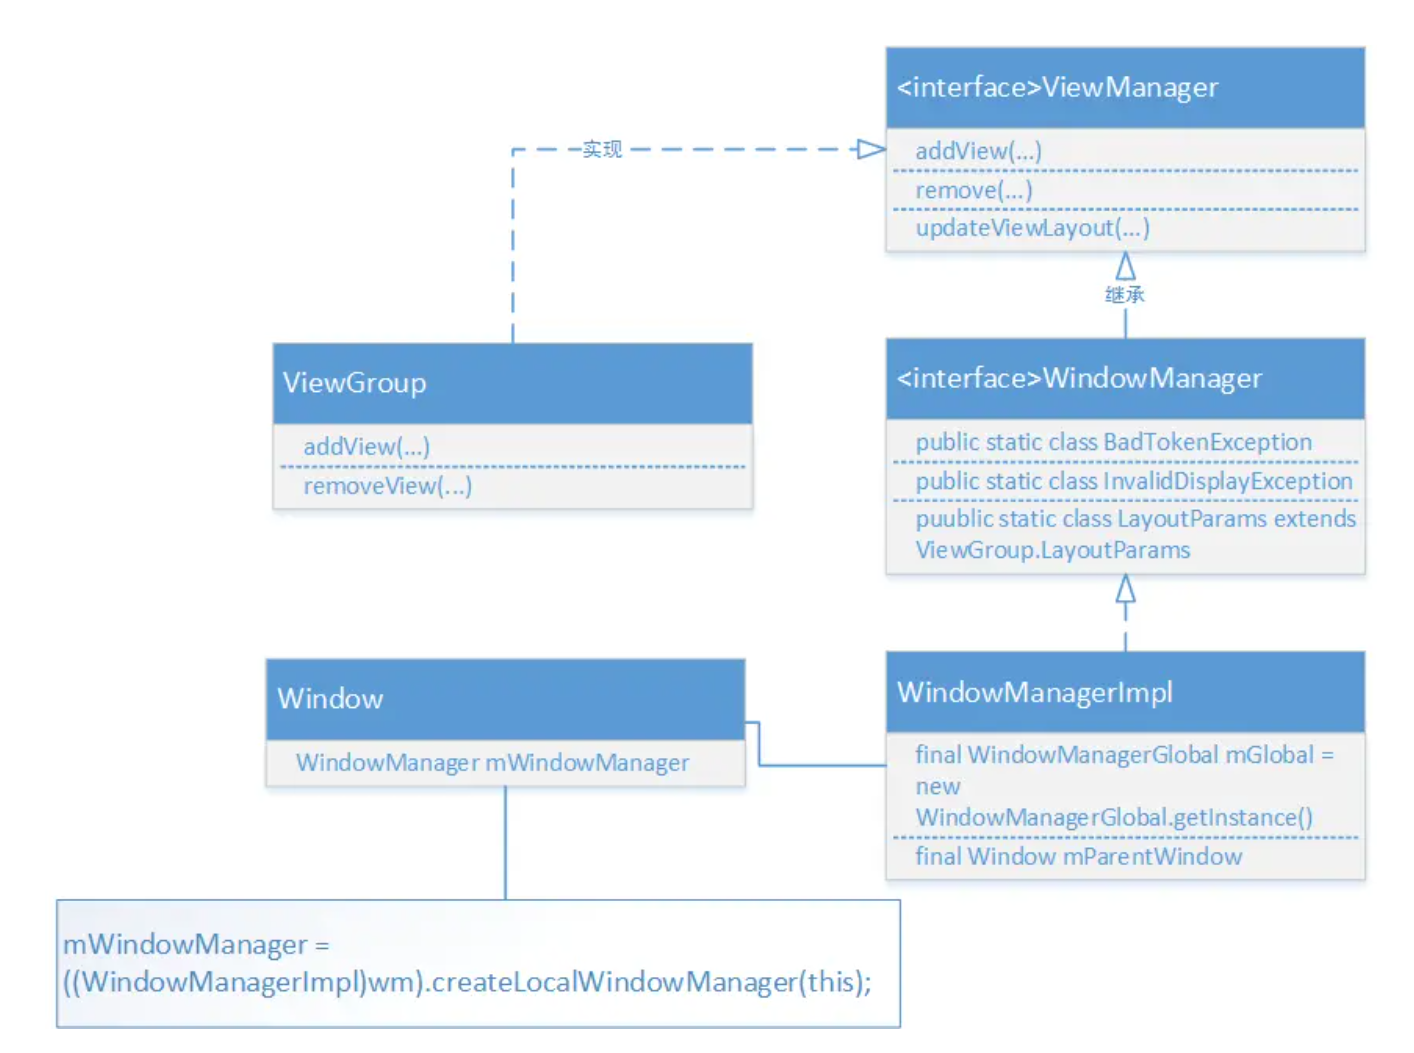
- 2.1 ViewManager
- 2.2 WindowManager
- 2.3 WindowManagerImpl
- 3.
- 参考资料
- 添加链接描述
- 添加链接描述
一. 关系图概览
二. 各层级概述
1. Activity
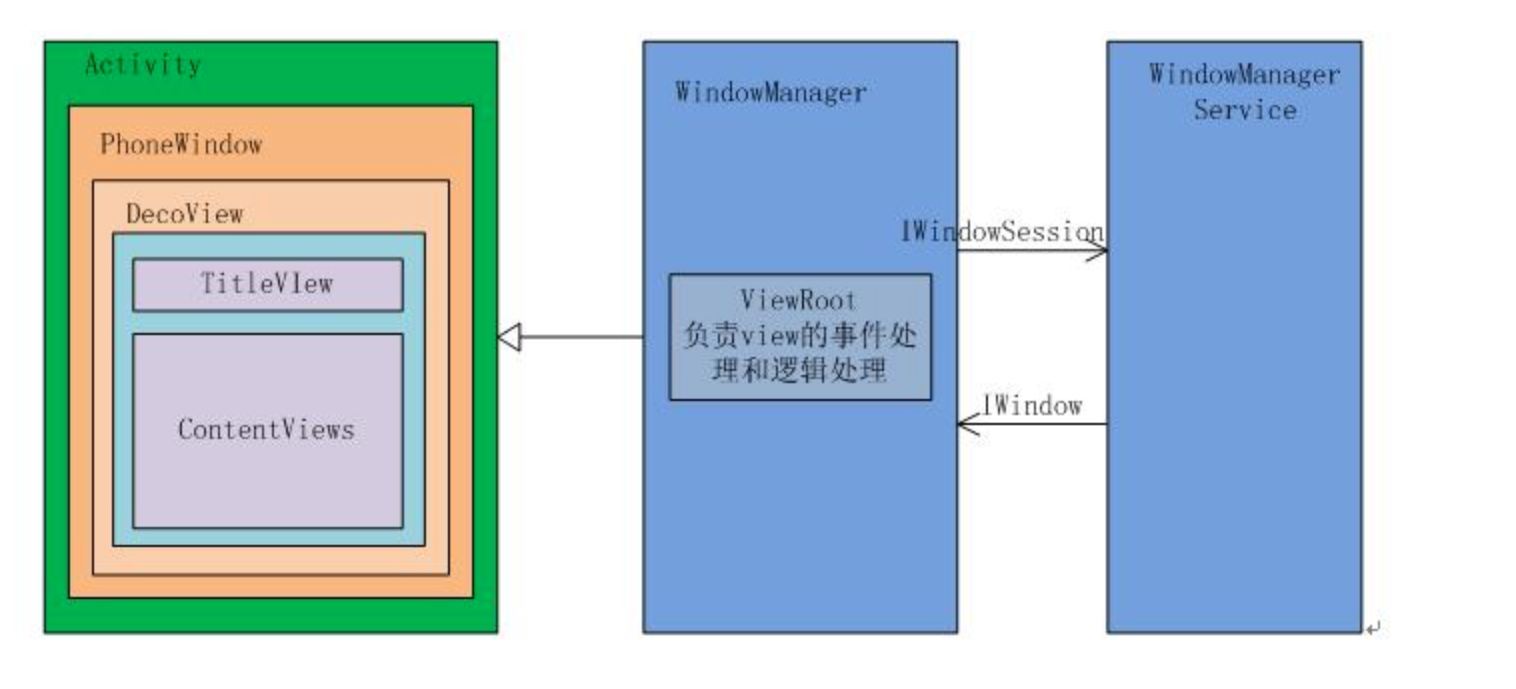
- Activity并不负责视图控制,它只是控制生命周期和处理事件。真正控制视图的是Window。
- 一个Activity包含了一个Window,Window才是真正代表一个窗口。
- Activity就像一个控制器,统筹视图的添加与显示,以及通过其他回调方法,来与Window、以及View进行交互。
2. Window
- Window是视图的承载器,内部持有一个 DecorView,而这个DecorView才是 view 的根布局。
- Window是一个抽象类,实际在Activity中持有的是其子类PhoneWindow。
- PhoneWindow中有个内部类DecorView,通过创建DecorView来加载Activity中设置的布局R.layout.activity_main。
- Window 通过WindowManager将DecorView加载其中,并将DecorView交给ViewRoot,进行视图绘制以及其他交互。
3. PhoneWindow
- 将Decoriew设置为整个应用窗口的根View,是Window的实现类。
- 它是Android中的最基本的窗口系统,每个Activity均会创建一个PhoneWindow对象,是Activity和整个View系统交互的接口。
4. DecorView
- DecorView是FrameLayout的子类,它可以被认为是Android视图树的根节点视图。
- DecorView作为顶级View,一般情况下它内部包含一个竖直方向的LinearLayout,在这个LinearLayout里面有上下三个部分,上面是个ViewStub,延迟加载的视图(应该是设置ActionBar,根据Theme设置),中间的是标题栏(根据Theme设置,有的布局没有),下面的是内容栏。 具体情况和Android版本及主体有关。
5. ViewRoot
- ViewRoot对应ViewRootImpl类,它是连接WindowManagerService和DecorView的纽带,View的三大流程(测量,布局,绘制)均通过ViewRoot来完成。
- ViewRoot并不属于View树的一份子。从源码实现上来看,它既非View的子类,也非View的父类,但是,它实现了ViewParent接口,这让它可以作为View的名义上的父视图。ViewRoot继承了Handler类,可以接收事件并分发,Android的所有触屏事件、按键事件、界面刷新等事件都是通过ViewRoot进行分发的。
6. WindowManager
- WindowManager 是 Android提供的一个接口,用于管理应用窗口的显示。它允许应用程序与系统窗口管理器交互,添加、更新或移除窗口。
- 开发者通常通过 Context.getSystemService(Context.WINDOW_SERVICE) 获取其实例。
- WindowManager 是客户端(应用)用来与 WindowManagerService 通信的代理。
- 应用通过 WindowManager 提交窗口请求,最终由 WindowManagerService 统一调度和管理。
7. WindowManagerService
- WindowManagerService(简称 WMS)是 Android 系统的核心服务之一,运行在 System Server 进程中。
- 它负责管理所有窗口的布局、显示顺序、焦点控制、输入事件分发等核心功能。
- 它与底层的 SurfaceFlinger 交互,将窗口内容渲染到屏幕上。
三. 基于源码的深入分析
1. PhoneWindow,DecorView,setContentView源码理解
- Window
抽象基类,它提供了一系列窗口的方法,比如背景,标题等等,而它的唯一实现类则是PhoneWindow
/**
* Abstract base class for a top-level window look and behavior policy. An
* instance of this class should be used as the top-level view added to the
* window manager. It provides standard UI policies such as a background, title
* area, default key processing, etc.
*
* <p>The only existing implementation of this abstract class is
* android.view.PhoneWindow, which you should instantiate when needing a
* Window.
*/
public abstract class Window
{
...
@Nullable
public View findViewById(@IdRes int id) {
return getDecorView().findViewById(id);
}
/**
* Convenience for * {@link #setContentView(View, android.view.ViewGroup.LayoutParams)}
* to set the screen content from a layout resource. The resource will be * inflated, adding all top-level views to the screen. * * @param layoutResID Resource ID to be inflated.
* @see #setContentView(View, android.view.ViewGroup.LayoutParams)
*/
public abstract void setContentView(@LayoutRes int layoutResID);
...
}- PhoneWindow
Window的唯一实现类
public class PhoneWindow
extends Window implements MenuBuilder.Callback {
private final static String TAG = "PhoneWindow";
...
// This is the top-level view of the window, containing the window decor.
private DecorView mDecor;
// This is the view in which the window contents are placed. It is either
// mDecor itself, or a child of mDecor where the contents go.
private ViewGroup mContentParent;
private ViewGroup mContentRoot;
...
}
在PhoneWindow里面,出现了成员变量DecorView的而这里,DecorView则是PhoneWindow里面的一个内部类,它是继承与FrameLayout
// 既然是FrameLayout,也就可以加载布局文件,也就是说,我们那些标题栏,内容栏,
/ 顶级上看是加载在DecorView上的。而DecorView则是由PhoneWindow负责添加
private final class DecorView
extends FrameLayout implements RootViewSurfaceTaker {
/* package */int mDefaultOpacity = PixelFormat.OPAQUE;
/** The feature ID of the panel, or -1 if this is the application's DecorView */
private final int mFeatureId;
private final Rect mDrawingBounds = new Rect();
private final Rect mBackgroundPadding = new Rect();
private final Rect mFramePadding = new Rect();
private final Rect mFrameOffsets = new Rect();
....
}- setContentView源码流程
activity.setContentView,实际上调用到的是它的实现类方法phoneWindow.setContentView
@Override
public void setContentView(View view, ViewGroup.LayoutParams params) {
// 如果没有创建 mContentParent,则初始化 DecorView 和内容父布局
if (mContentParent == null) {
installDecor();
} else if (!hasFeature(FEATURE_CONTENT_TRANSITIONS)) {
// 如果不使用过渡动画,直接移除旧内容
mContentParent.removeAllViews();
}
if (hasFeature(FEATURE_CONTENT_TRANSITIONS)) {
// 使用过渡动画时,将新 View 作为过渡内容添加
final Scene newScene = Scene.getSceneForLayout(mContentParent, view, mContext);
transitionTo(newScene);
} else {
// 否则直接添加 View 到内容父布局中
mContentParent.addView(view, params);
}
}
2. DecorView创建流程
前置知识:
- ViewManager
- WindowManager
- WindowManagerImpl